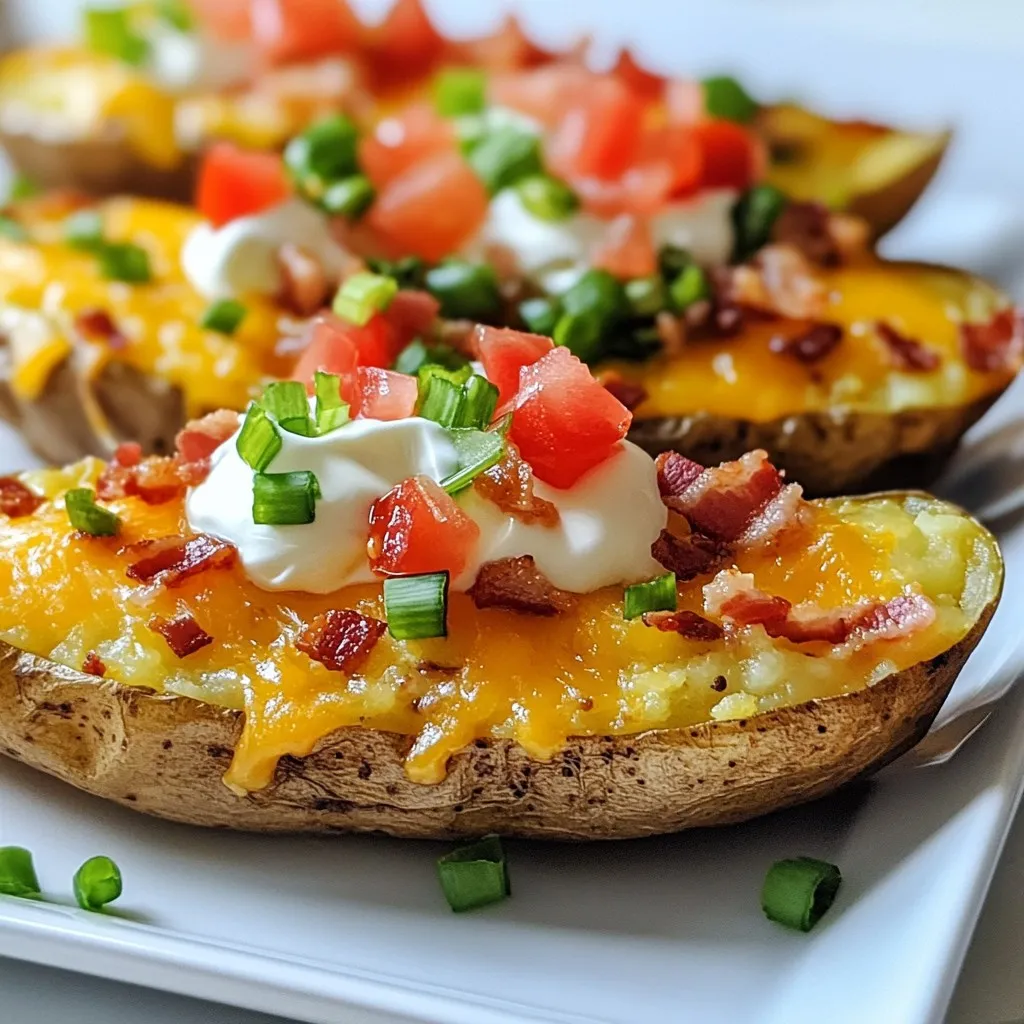
Craving a snack that’s cheesy, crispy, and loaded with flavor? Look no further than my Cheesy Loaded Potato Skins! These delicious bites combine tender potato, melty cheese, and your favorite toppings. Perfect for any gathering or a cozy night in, they’re easy to make and guaranteed to impress. Jump in as I guide you through the simple steps to create this irresistible treat!
Why I Love This Recipe
- Comfort Food Classic: These cheesy loaded potato skins are the ultimate comfort food, combining crispy textures with rich flavors that everyone loves.
- Customizable Toppings: You can easily personalize these potato skins with your favorite toppings, from spicy jalapeños to fresh veggies, making them perfect for any occasion.
- Easy to Make: This recipe is simple and straightforward, making it accessible for cooks of all skill levels. Perfect for a quick snack or game day treat!
- Great for Sharing: These loaded potato skins are perfect for sharing with friends and family, turning any gathering into a festive event.
Ingredients
Main Ingredients
– 4 large russet potatoes
– 1 tablespoon olive oil
– 1 teaspoon garlic powder
– 1 teaspoon onion powder
– Salt and pepper to taste
– 1 cup shredded cheddar cheese
– ½ cup cooked and crumbled turkey bacon (or vegetable bacon for a meat-free option)
– ½ cup sour cream
– ¼ cup green onions, chopped
– ½ cup diced tomatoes
– Optional: jalapeño slices for spice
To start, the large russet potatoes are key. They have a thick skin that crisps up well. The olive oil helps create that golden color and adds flavor. Garlic powder and onion powder bring depth to each bite. We use salt and pepper to enhance all other tastes.
Next, cheese is essential. I love using shredded cheddar cheese for its rich flavor. The crispy turkey bacon adds a nice crunch. For a fresh touch, we add chopped green onions and diced tomatoes.
Optional Ingredients
– Meat-free options
– Extra spices for flavor enhancement
If you want a meat-free option, use vegetable bacon. It still gives a good texture. You can also add extra spices like smoked paprika or cayenne for more kick. Each choice can change the taste of your potato skins. Feel free to mix and match based on what you enjoy!

Step-by-Step Instructions
Preparation Steps
1. First, preheat your oven to 400°F (200°C). This step is key for crisp skins.
2. Next, scrub the potatoes clean under running water. Dry them well with a towel.
3. Poke each potato several times with a fork. This lets steam escape as they bake.
4. Rub the potatoes with olive oil. Sprinkle garlic powder, onion powder, salt, and pepper on top.
5. Now, place the potatoes directly on the oven rack. Bake for 45-50 minutes until tender.
Filling the Potato Skins
1. After baking, remove the potatoes from the oven. Let them cool for a few minutes.
2. Once cool, cut each potato in half lengthwise. Scoop out some flesh, leaving a thin layer.
3. Place the scooped potato flesh in a bowl. Add half of the shredded cheddar cheese and crumbled turkey bacon.
4. Mix well until everything is combined. This filling will add great flavor to your skins.
Final Baking
1. Spoon the filling back into the potato skins. Pack the mixture in generously.
2. Top each potato skin with the remaining cheddar cheese. This makes them extra cheesy.
3. Place the filled skins on a baking sheet. Return them to the oven for 10-15 minutes.
4. Bake until the cheese is melted and bubbly. This step creates a delicious gooey layer.
5. Remove from the oven and let cool a bit. Top with diced tomatoes, sour cream, and green onions.
6. If you like spice, add jalapeño slices on top. They add a nice kick to the dish.
Tips & Tricks
Cooking Tips
– Ensuring crispy potato skins: For crispy skins, poke holes in the potatoes before baking. This allows steam to escape. Rub them with olive oil and seasonings to add flavor and help crisp the skin. Bake them directly on the oven rack for even heat.
– Cheese melting techniques: To get that gooey cheese, use shredded cheese instead of slices. Layer it on thick for the best melt. Bake the filled skins until the cheese bubbles. For a golden finish, broil them for a minute or two at the end. Just keep an eye on them to avoid burning.
Presentation Tips
– Serving suggestions: Serve your cheesy loaded potato skins on a large platter for a fun presentation. You can also use individual plates for a more personal touch.
– Garnishing ideas: Top the skins with diced tomatoes and a dollop of sour cream. Add chopped green onions for a fresh look. For a spicy kick, include jalapeño slices. These toppings add color and flavor, making them more appealing.
Pro Tips
- Choose the Right Potatoes: For the best texture and flavor, opt for large russet potatoes as they have the perfect balance of starch and moisture.
- Enhance Flavor: Experiment with additional seasonings like paprika or smoked paprika to give your potato skins a unique and delicious twist.
- Cheese Variations: Try using a mix of cheeses such as Monterey Jack or pepper jack for a spicier kick and extra creaminess.
- Make Ahead: You can prepare the potato skins in advance and refrigerate them. Just bake them for a few extra minutes when ready to serve.
Variations
Flavor Combinations
You can make cheesy loaded potato skins even more fun by mixing flavors. Try adding different cheeses. Mozzarella brings a nice stretch. Gouda adds a smoky touch. You can also mix cheddar with pepper jack for a spicy kick.
Toppings can change the whole dish too. Instead of turkey bacon, try crumbled sausage or crispy chickpeas for a crunch. Add black olives for a Mediterranean flair. You can also include avocado slices or salsa for a fresh taste.
Dietary Adjustments
If you want a vegan or vegetarian version, swap out dairy. Use plant-based cheese instead of cheddar. For sour cream, choose vegan sour cream or cashew cream. You can also use mushrooms or tempeh for added protein.
Need gluten-free options? No problem! Just make sure to use gluten-free potato skins. Most toppings are already gluten-free. Check labels on any sauces or cheese to be sure. Enjoy your cheesy loaded potato skins everyone can eat!
Storage Info
Leftover Storage
You can store leftover cheesy loaded potato skins easily. First, let them cool down to room temperature. Then, place them in an airtight container. They will last in the fridge for about 3-5 days. Make sure to keep them covered to avoid drying out.
If you want to keep them longer, freezing is a great option. Wrap each potato skin tightly in plastic wrap, then place them in a freezer-safe bag. They can stay frozen for up to 3 months. When you’re ready to enjoy them again, just thaw them in the fridge overnight.
Reheating Guidelines
Reheating your potato skins can bring back their cheesy goodness. The oven is the best choice for this. Preheat the oven to 350°F (175°C). Place the potato skins on a baking sheet and heat for about 10-15 minutes. This method keeps the skins crispy.
If you need a quicker option, you can use the microwave. Place the potato skins on a microwave-safe plate. Heat in short bursts of 30 seconds. Check if they are warm enough. This method may make the skins softer, but it works in a pinch.
FAQs
How long to bake potatoes for loaded skins?
Bake your russet potatoes for about 45-50 minutes at 400°F (200°C). They should feel soft when you poke them with a fork. This step makes the skins crispy and the insides perfect for scooping.
Can I use other types of potatoes?
Yes, you can use other potatoes like Yukon Gold or red potatoes. Each type brings its own flavor. Russet potatoes are great for their size and texture, but feel free to explore. Just adjust baking times if the potatoes are smaller.
What can I substitute for sour cream?
If you want a different taste, try Greek yogurt as a sour cream substitute. It has a similar texture and tang. You can also use cottage cheese for a lighter option. For a vegan choice, look for plant-based sour cream.
This blog post shared how to make loaded potato skins. You learned about main ingredients like russet potatoes, cheese, and seasonings. We discussed preparation steps, from baking to filling the skins, and tips for making them crispy. Various flavor combinations and dietary adjustments were also covered. Lastly, we reviewed storage and reheating methods for leftovers. Enjoy your tasty creations, and don’t be afraid to experiment with new flavors and topping