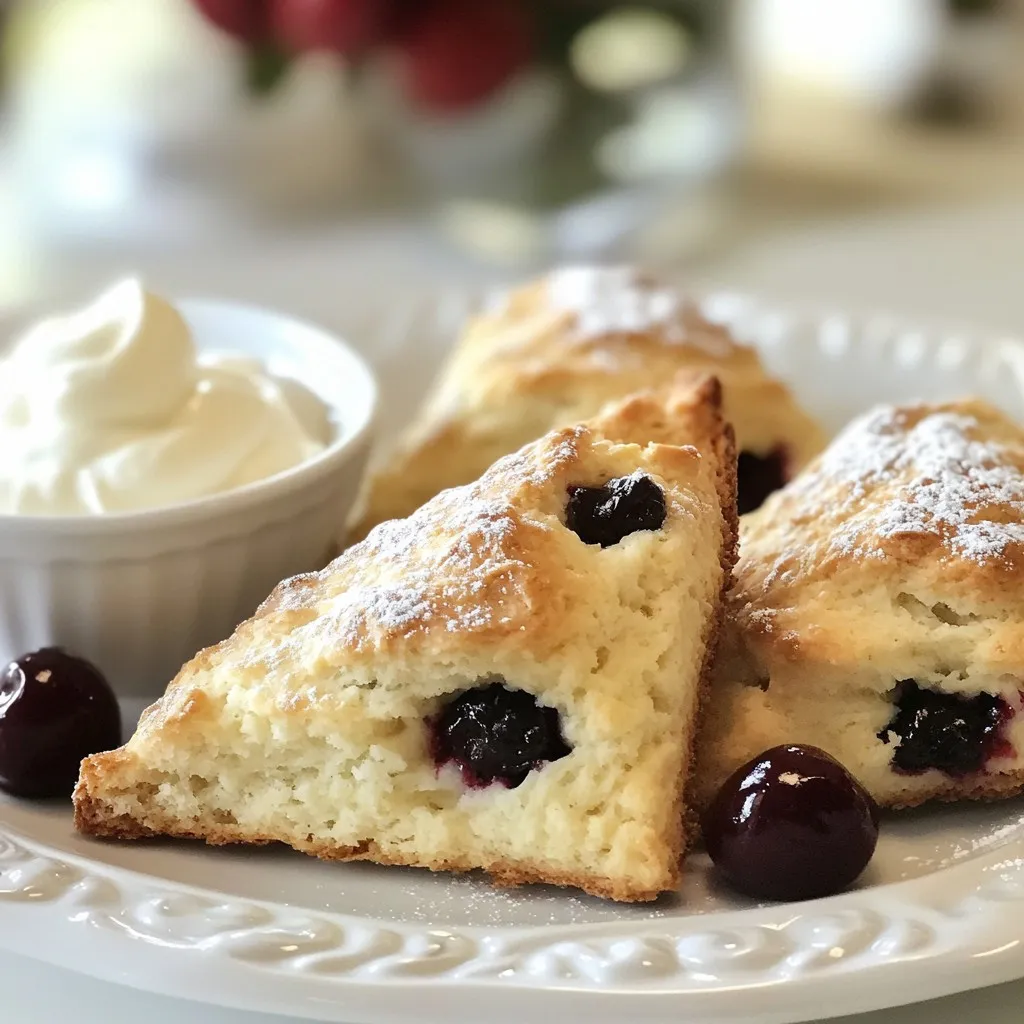
If you crave a sweet treat that combines the rich taste of dark chocolate with tart, juicy cherries, then you’re in for a treat! In this blog post, I’ll guide you through making Cherry Chocolate Chunk Scones, a delightful pastry that’s perfect for breakfast or a snack. You’ll love how easy these are to make, and each bite will leave you wanting more. Let’s dive into these irresistible delights!
Why I Love This Recipe
- Bright and Flavorful: The combination of fresh cherries and rich dark chocolate creates a delightful burst of flavor in every bite.
- Quick and Easy: This recipe comes together in just 35 minutes, making it perfect for a last-minute treat or brunch addition.
- Versatile Enjoyment: These scones can be enjoyed warm, at room temperature, or even toasted, making them great for any occasion.
- Elegant Presentation: With a sprinkle of powdered sugar and a side of clotted cream, these scones are sure to impress your guests.
Ingredients
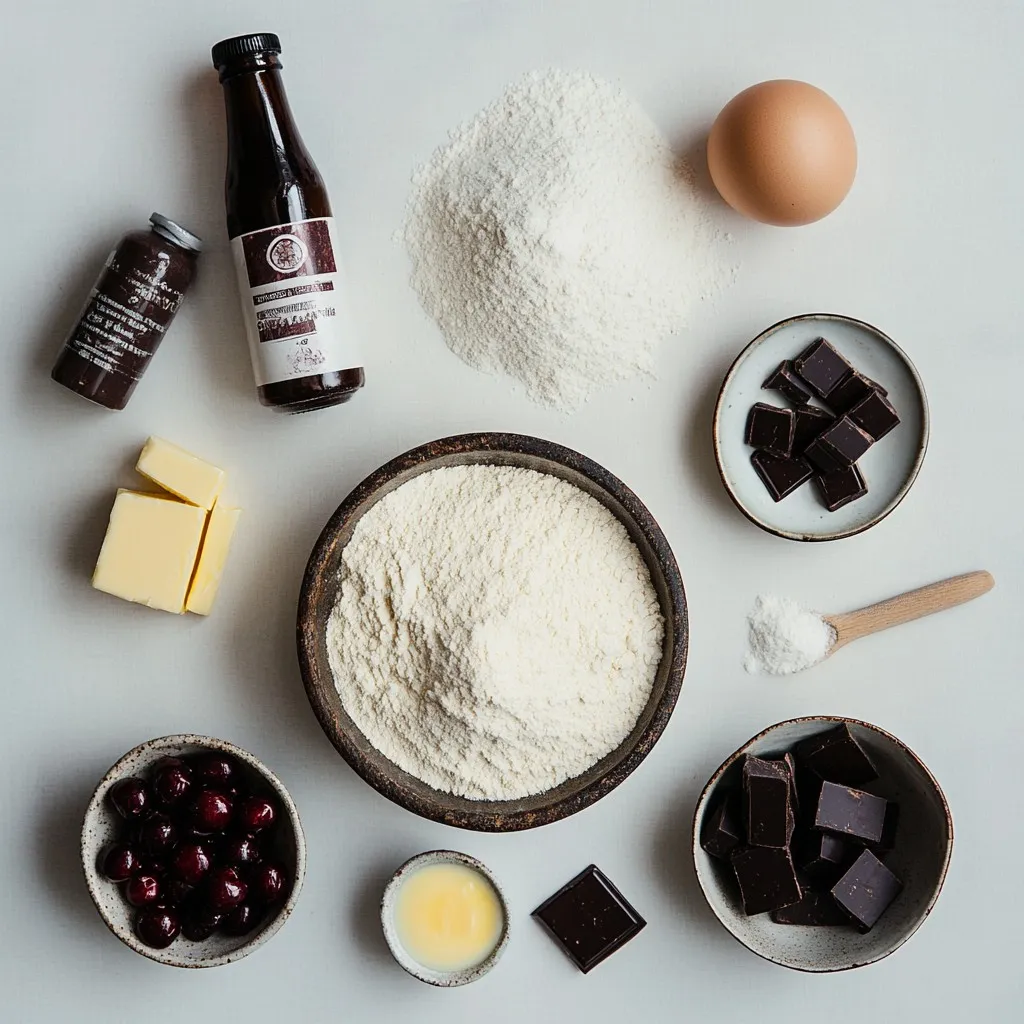
List of Ingredients
– 2 cups all-purpose flour
– 1/4 cup granulated sugar
– 1 tablespoon baking powder
– 1/2 teaspoon salt
– 1/2 cup unsalted butter, cold and cubed
– 1/2 cup heavy cream
– 1 large egg
– 1 teaspoon vanilla extract
– 1 cup fresh cherries, pitted and chopped
– 1/2 cup dark chocolate chunks
– Egg wash (1 egg whisked with 1 tablespoon water)
– Coarse sugar for sprinkling
Gathering your ingredients is the first step to making these cherry chocolate chunk scones. Start with the flour, sugar, and baking powder. These form the base of your scone dough. The salt adds flavor, while the cold butter gives the scones a flaky texture. Use unsalted butter so you can control the salt level.
Next, you need heavy cream, which adds richness. The large egg binds the dough, and vanilla extract brings out the flavor. Fresh cherries give a sweet and tart burst, while dark chocolate chunks add indulgence.
Finally, prepare the egg wash and coarse sugar for the topping. The egg wash gives your scones a nice golden color, and the coarse sugar adds a delightful crunch.
With all these ingredients on hand, you’re ready to create a delicious treat.
Step-by-Step Instructions
Preheat and Prepare
– Preheat oven to 400°F (200°C).
– Line a baking sheet with parchment paper.
Make the Dough
– In a large bowl, combine 2 cups of flour, 1/4 cup of sugar, 1 tablespoon of baking powder, and 1/2 teaspoon of salt.
– Add 1/2 cup of cold, cubed butter. Work it into the flour until it looks like coarse crumbs.
– In another bowl, whisk together 1/2 cup of heavy cream, 1 large egg, and 1 teaspoon of vanilla.
– Slowly combine this wet mix with the dry ingredients. Stir gently to combine, but don’t overmix.
Shape and Bake
– Fold in 1 cup of chopped cherries and 1/2 cup of dark chocolate chunks.
– Turn the dough onto a lightly floured surface. Knead it gently a few times to form a ball.
– Pat the dough into a circle about 1 inch thick. Cut it into 8 wedges or use a biscuit cutter for rounds.
– Place the scones on the prepared sheet. Brush with the egg wash and sprinkle with coarse sugar.
– Bake for 15-20 minutes. Look for a golden brown color and a cooked center.
– Let the scones cool on the sheet for a few minutes. Then, move them to a wire rack to cool completely.
Tips & Tricks
Perfecting the Scones
Using cold ingredients is key to great scones. Cold butter helps create flaky layers. When you mix the butter with flour, it should stay in small bits. This is how you get that lovely texture.
Avoid overmixing the dough. Mix just until the ingredients come together. If you stir too much, the scones get tough. You want them light and tender.
Serving Suggestions
For serving, presentation matters. Arrange the scones on a rustic platter. A sprinkle of powdered sugar adds a nice touch. Serve them warm or at room temperature for the best flavor.
Pair your scones with clotted cream or whipped cream. These creamy options add richness and balance the flavors. You can also serve fresh fruit on the side for a burst of color.
Common Mistakes to Avoid
Don’t use warm butter. It makes the dough greasy and dense. Always use cold, cubed butter for the best result.
Measuring ingredients accurately is crucial. A little too much flour can change the whole texture. Use a kitchen scale for exact amounts, if possible. This will help you make the perfect scones every time.
Pro Tips
- Use Cold Ingredients: Ensure your butter and cream are cold to achieve a flakier scone texture.
- Don’t Overmix: Mix the dough just until combined to keep the scones tender and light.
- Chop Cherries Uniformly: Cut the cherries into similar sizes for even distribution in the dough.
- Egg Wash for Shine: Brush the tops with egg wash before baking for a beautiful golden finish.
Variations
Fruit Alternatives
You can switch cherries for other fruits. Raspberries and blueberries work well. They add a nice color and taste. You can also use diced strawberries for a fun twist. Each fruit gives the scones a unique flavor. Just make sure to keep the amount close to one cup. This way, your scones stay moist and flavorful.
Chocolate Options
Feel free to use different types of chocolate. Milk chocolate adds sweetness and creaminess. White chocolate gives a rich, buttery taste. Both options blend well with the fruit. If you love dark chocolate, try using more chunks for a richer flavor. Adjust the amount based on your taste. This choice makes every batch special.
Gluten-Free Version
You can make these scones gluten-free easily. Use a gluten-free flour blend instead of all-purpose flour. Look for a blend that includes xanthan gum for better texture. The rest of the recipe stays the same. This way, everyone can enjoy these scones. Just remember to check the labels for any hidden gluten. Enjoy your tasty treat without worry!
Storage Info
How to Store Scones
To keep your cherry chocolate chunk scones fresh, store them in an airtight container. Place a piece of parchment paper between layers to avoid sticking. You can keep them at room temperature for up to two days. If you want them to last longer, consider refrigerating them. This method can help maintain their softness but may slightly change their texture.
Freezing Instructions
You can freeze these scones either before or after baking. For freezing before baking, shape the scones and place them on a baking sheet. Freeze them for about one hour until firm. Then, transfer the scones to a freezer bag. When you’re ready to bake, you can bake them straight from the freezer. Just add a few extra minutes to the baking time. If you freeze them after baking, let them cool completely first. Then, wrap each scone in plastic wrap and place them in a freezer bag.
Reheating Guidance
To restore freshness to your scones, reheat them in the oven. Preheat your oven to 350°F (175°C). Place the scones on a baking sheet and cover them with foil to prevent them from drying out. Heat for about 10 minutes. If you prefer, you can also use a microwave. Just heat them for about 15-20 seconds. However, the oven method gives you a better texture. Enjoy your warm scones just like they came out of the oven!
FAQs
Can I use frozen cherries?
Yes, you can use frozen cherries! Just make sure to thaw them first. After thawing, drain any extra juice. This keeps your dough from getting too wet. Chop the cherries into small pieces before adding them to the dough. This way, you still get bursts of cherry flavor in every bite.
What can I substitute for heavy cream?
If you need a dairy-free option, try coconut milk or almond milk. For lower fat, use half-and-half. Both will work well in the recipe. Just make sure the alternative has some fat to keep the scones tender. This keeps the texture nice while still being a bit lighter.
How long do the scones last?
These scones stay fresh for about two days at room temperature. Store them in an airtight container for best results. If you want them to last longer, freeze them! They can stay good in the freezer for up to three months. Just let them cool before freezing. When ready to eat, reheat them in the oven for a warm treat.
This blog post covered how to make delicious cherry chocolate chunk scones. We explored key ingredients, simple steps, and tips to ensure success. I shared ways to serve, store, and even freeze your scones. Avoid common mistakes for the best result.
These scones are great for breakfast or snacks. Enjoy making them and experimenting with flavors! You’ll create a treat everyone loves. Happy bakin