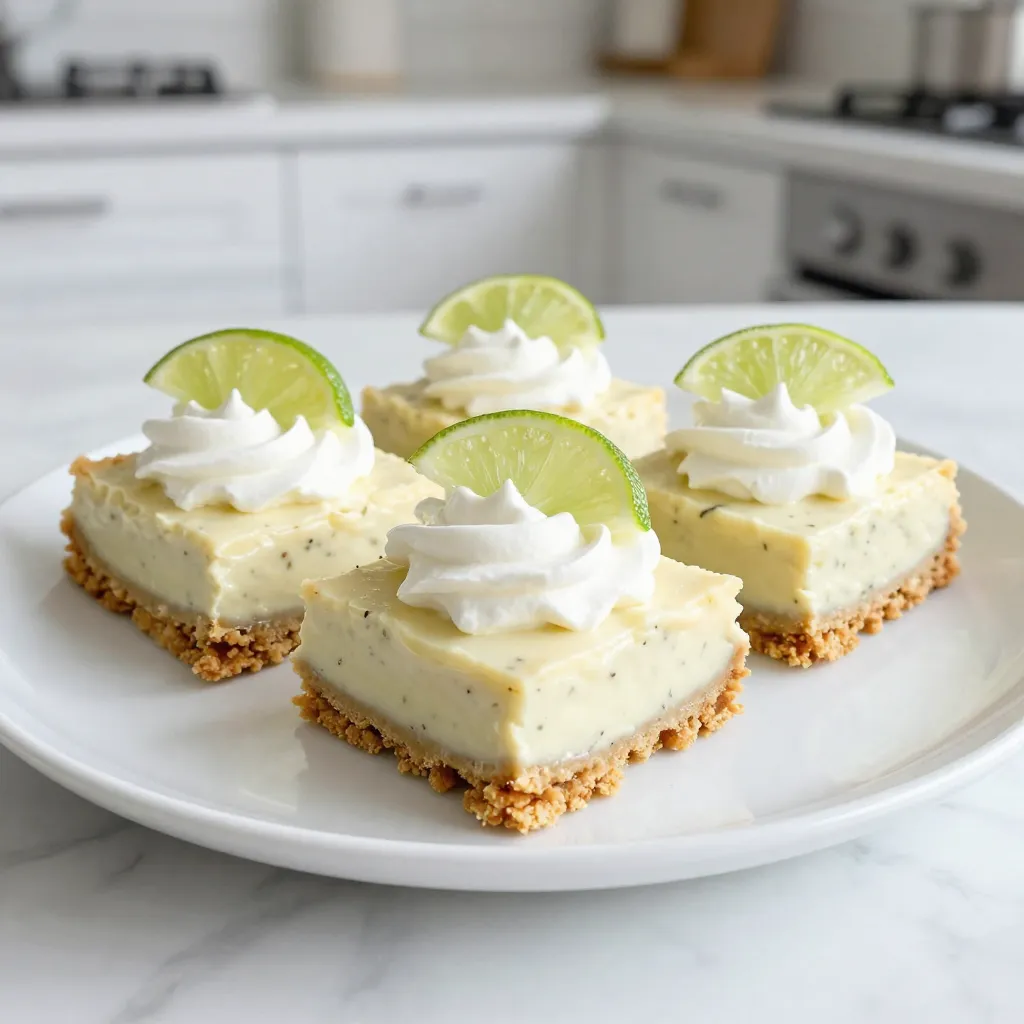
Are you ready to enjoy a tasty treat that’s simple to make? My delicious Key Lime Pie Bars combine zesty lime flavor with a buttery crust. Not only are these bars easy to whip up, but they also offer a refreshing twist on classic key lime pie. In this post, I’ll share everything you need, from ingredients to tips, to make your baking experience a breeze. Let’s dive in and create something sweet!
Why I Love This Recipe
- Bright and Tangy Flavor: The combination of fresh key lime juice and zest gives these bars a vibrant, refreshing taste that’s perfect for any occasion.
- Easy to Make: This recipe requires simple ingredients and straightforward steps, making it a great choice for bakers of all skill levels.
- Perfect for Sharing: Cut them into bars, and they’re easy to serve at parties, gatherings, or potlucks, ensuring everyone gets a delightful treat.
- Chilled Delight: After chilling in the fridge, these bars become the ultimate summer dessert, cool and creamy with a delightful crunch from the crust.
Ingredients
List of Ingredients for Key Lime Pie Bars
To make these Key Lime Pie Bars, you will need:
– 1 ½ cups graham cracker crumbs
– ½ cup unsalted butter, melted
– ⅓ cup granulated sugar (for crust)
– 2 cans (14 oz each) sweetened condensed milk
– ¾ cup fresh key lime juice (or regular lime juice)
– 4 large egg yolks
– Zest of 2 key limes (or regular limes)
– ¼ teaspoon salt
– Whipped cream (for topping)
– Lime slices (for garnish)
Substitutions for Key Ingredients
You can swap some ingredients if you need to. If you don’t have graham cracker crumbs, try vanilla wafer crumbs. For butter, coconut oil works well too. If you can’t find key limes, regular limes are a fine choice.
Optional Toppings and Garnishes
Get creative with toppings! Besides whipped cream, you can add toasted coconut or crushed nuts. Fresh berries can also add a nice touch. A sprinkle of lime zest on top makes for a vibrant finish.

Step-by-Step Instructions
Preparing the Crust
To start, preheat your oven to 350°F (175°C). In a mixing bowl, combine 1 ½ cups of graham cracker crumbs, ½ cup of melted unsalted butter, and ⅓ cup of granulated sugar. Mix until it looks crumbly. Press this crumb mixture firmly into the bottom of a 9×9-inch baking dish. Make sure it forms an even layer. Bake the crust for 8 to 10 minutes, until it is lightly golden. After baking, take it out and let it cool.
Making the Lime Filling
In another bowl, whisk together 2 cans of sweetened condensed milk, ¾ cup of fresh key lime juice, 4 large egg yolks, the zest of 2 key limes, and ¼ teaspoon of salt. Mix until the filling is smooth and blended well. Pour this lime filling over your cooled crust. Spread it evenly to cover the crust.
Baking and Cooling Process
Next, return the dish to the oven. Bake for another 15 to 20 minutes. The filling should be set but still have a slight jiggle in the center. After baking, take it out and let it cool to room temperature. Once cooled, refrigerate the bars for at least 2 hours until they are fully chilled. When ready, cut them into bars. Serve topped with whipped cream and a slice of lime for garnish.
Tips & Tricks
How to Achieve the Perfect Texture
To get smooth bars, focus on the filling. Whisk the sweetened condensed milk and egg yolks well. Make sure there are no lumps. When baking, keep an eye on the time. You want the filling to be set but still slightly jiggly in the center. This gives your bars a creamy texture. Let them cool completely before cutting. Chilling in the fridge helps firm them up, too.
Ways to Enhance Flavor
Adding zest is key. Use the zest of two key limes for a bright taste. If you want more zing, add a bit of lime juice. You can even mix in a touch of vanilla extract. This adds a nice depth to the flavor. If you like it sweeter, adjust the sugar. Taste the filling before baking to find the right balance for you.
Common Mistakes to Avoid
One common mistake is overbaking. If the filling is too firm, your bars will not be creamy. Also, don’t skip the chilling time. Cutting them too soon can make a mess. Another tip is to press the crust firmly. If it’s too loose, it won’t hold together well. Finally, remember to use fresh ingredients, especially the limes. Fresh juice makes a huge difference in taste.
Pro Tips
- Use Fresh Limes: For the best flavor, always use fresh key limes or regular limes instead of bottled juice.
- Chill Thoroughly: Allow the pie bars to chill in the refrigerator for at least 2 hours for a firmer texture and better flavor.
- Perfect Crust: Press the graham cracker crust firmly to eliminate air pockets and ensure it holds together well after baking.
- Garnish Creatively: Add additional garnishes like lime zest or mint leaves to enhance presentation and flavor.
Variations
Different Citrus Options
You can switch up the flavor of your Key Lime Pie Bars. Instead of key limes, use regular limes or even lemons. Lemons give a nice tart taste. You can also try blood oranges for a unique twist. This change keeps the bars fresh and fun.
Gluten-Free Crust Alternatives
If you want a gluten-free version, use almond flour or gluten-free graham crackers. Press these into the dish just like the regular crust. This keeps the texture nice and crumbly. You won’t miss the gluten at all!
Variants for Toppings and Fillings
Topping your bars can change their look and taste. Use fresh berries, like raspberries or blueberries, on top of whipped cream. You can also sprinkle coconut flakes for a tropical flair. Adding a drizzle of honey or a sprinkle of zest can make them pop. Feel free to mix and match!
Storage Info
How to Store Leftover Bars
To keep your Key Lime Pie Bars fresh, store them in the fridge. Use an airtight container for best results. This helps prevent them from drying out. They can stay good for about 3 to 5 days. If you want them to last longer, consider freezing them.
Freezing Key Lime Pie Bars
You can freeze these bars for later enjoyment. First, cut them into individual pieces. Wrap each piece in plastic wrap. Then, place the wrapped bars in a freezer bag or container. Make sure to label it with the date. They can stay in the freezer for up to 3 months. To enjoy, simply thaw in the fridge overnight.
Best Practices for Reheating
If you want to enjoy warm Key Lime Pie Bars, reheat them gently. Place a bar on a microwave-safe plate. Heat it in the microwave for about 10 to 15 seconds. Check to see if it is warm enough. Avoid overheating, as this can change the texture. Enjoy them fresh, chilled, or warm, as you prefer!
FAQs
How do I make key lime pie bars in advance?
You can make key lime pie bars ahead of time. First, prepare the crust and filling as usual. Bake and cool the bars completely. After that, cover the dish with plastic wrap. Place it in the fridge. You can store them for up to three days. This lets the bars set well, making them taste even better.
Can I use bottled lime juice instead of fresh juice?
Yes, you can use bottled lime juice. However, fresh lime juice gives a better flavor. Fresh juice tastes bright and zesty. Bottled juice may taste a bit flat. If you choose bottled juice, look for one with no added sugars. This choice helps keep the taste closer to fresh.
What’s the best way to cut the bars for serving?
To cut key lime pie bars neatly, use a sharp knife. First, cool the bars completely in the fridge. Then, run the knife under hot water for a few seconds. Wipe it dry before cutting. This helps create clean edges. Cut into 9 even squares for perfect servings. Enjoy your delicious treat!
Key lime pie bars are easy to make with simple ingredients. You learned how to prepare the crust, make the filling, and bake the bars. We discussed tips for the perfect texture and flavor. I shared fun variations and storage tips to keep them fresh.
Enjoy experimenting with your own toppings and flavors. You now have everything you need for delicious key lime pie bars. Thank you for joining me on this tasty journe