
Get ready to delight your taste buds with my Strawberry Chocolate Chip Scones! These flaky treats combine juicy strawberries and rich chocolate in every bite. Perfect for breakfast or a snack, they’re simple to make and guarantee smiles all around. I’ll guide you through each step, from mixing the batter to baking golden perfection. Let’s dive into this delicious adventure together!
Why I Love This Recipe
- Delicious Flavor Combination: The sweetness of fresh strawberries pairs perfectly with rich chocolate chips, creating a delightful taste in every bite.
- Easy to Make: This scone recipe requires minimal ingredients and is simple to prepare, making it perfect for both beginners and experienced bakers.
- Perfect for Any Occasion: Whether it’s breakfast, brunch, or an afternoon snack, these scones are versatile and sure to impress your guests.
- Freezable and Convenient: You can prepare the scone dough in advance and freeze it, allowing you to enjoy fresh scones whenever you crave them.
Ingredients
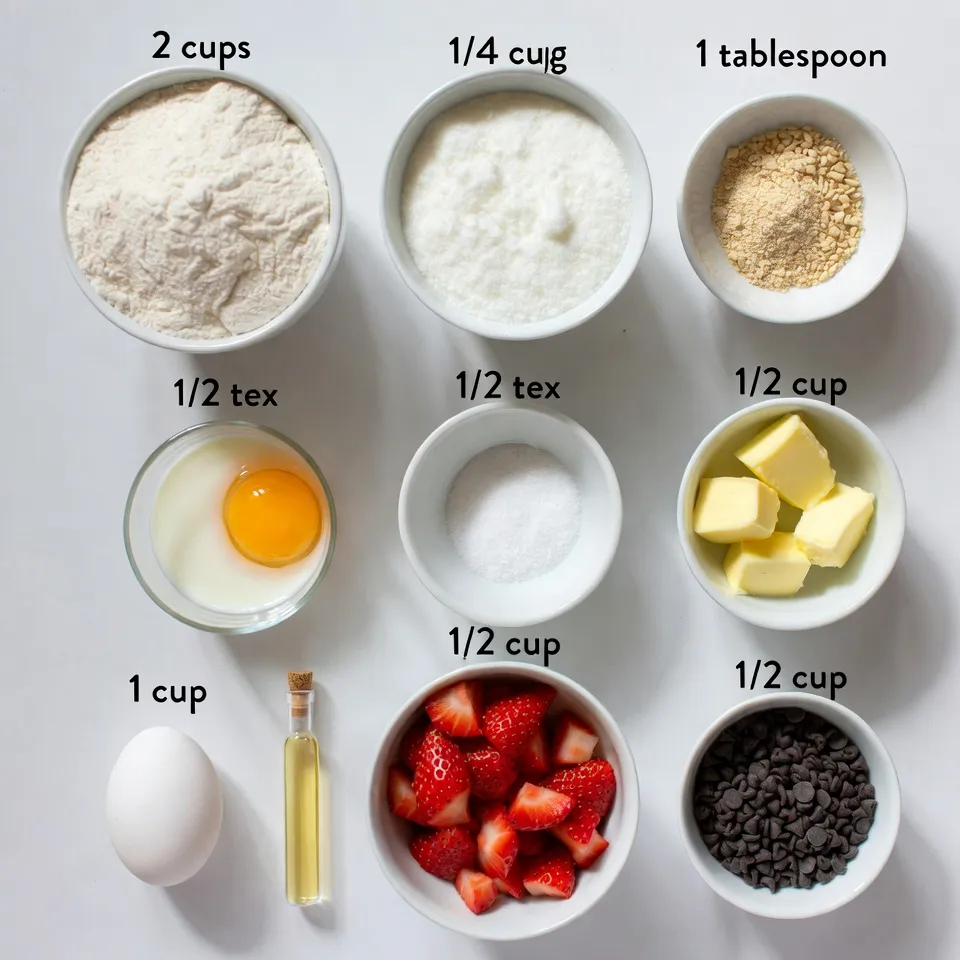
Main Ingredients List
– 2 cups all-purpose flour
– 1/4 cup granulated sugar
– 1 tablespoon baking powder
– 1/2 teaspoon salt
– 1/2 cup unsalted butter, cold and cubed
– 1/2 cup heavy cream
– 1 large egg
– 1 teaspoon vanilla extract
– 1 cup fresh strawberries, diced
– 1/2 cup chocolate chips (dark or semi-sweet)
– Extra flour for dusting
I love how simple yet delicious these ingredients are. Each one plays a key role in making scones that are flaky and flavorful. The flour forms the base, while the sugar adds sweetness. Baking powder gives the scones their lift, and salt enhances all the flavors.
The cold butter is essential. It keeps the scones tender. I often cut it into small cubes and chill it first. Heavy cream adds richness, while the egg binds everything together. Vanilla extract gives a warm flavor that complements the fruit and chocolate.
Fresh strawberries burst with juice, and chocolate chips bring a sweet touch. You can use dark or semi-sweet chocolate for a more intense flavor. Don’t forget to keep extra flour handy for dusting your work surface. It ensures the dough doesn’t stick.
Optional Add-ins
– Different types of chocolate (milk or white)
– Nuts for added crunch
– Zest from lemon or orange for flavor enhancement
If you want to get creative, add different types of chocolate. Milk or white chocolate can offer a sweeter twist. Nuts add a nice crunch to the soft scones. A little lemon or orange zest adds a refreshing zing that brightens the flavors.
Suggested Serving Accompaniments
– Whipped cream
– Fresh butter
– Powdered sugar for dusting
Serve your scones warm with whipped cream. It makes every bite feel special. Fresh butter is another great option. A light dusting of powdered sugar adds a pretty touch and extra sweetness. Enjoying these scones is a real treat!
Step-by-Step Instructions
Preparation Steps
1. Preheat your oven to 400°F (200°C). This step is key for a perfect bake. Line a baking sheet with parchment paper. This helps the scones not stick.
2. Grab a large mixing bowl. Whisk together 2 cups of all-purpose flour, 1/4 cup of granulated sugar, 1 tablespoon of baking powder, and 1/2 teaspoon of salt. Mix until everything is well combined.
3. Now, add 1/2 cup of cold, cubed unsalted butter to the bowl. Use a pastry cutter or your fingers. Work the butter into the dry mix until it looks like coarse crumbs.
Mixing Wet Ingredients
1. In a separate bowl, combine 1/2 cup of heavy cream, 1 large egg, and 1 teaspoon of vanilla extract. Whisk these together until smooth.
2. Pour the wet mixture into the dry mix. Stir gently until just combined. Be careful not to overmix; this keeps the scones light.
Forming & Baking the Scones
1. Fold in 1 cup of diced fresh strawberries and 1/2 cup of chocolate chips. Mix until they are evenly spread throughout the dough.
2. Turn the dough out onto a lightly floured surface. Knead it gently for about 1 minute. Form it into a circle about 1 inch thick. Cut the dough into 8 wedges, like a pizza, or use a round biscuit cutter if you prefer.
3. Place the scones on the prepared baking sheet. Space them about 2 inches apart. This allows them to rise nicely.
4. Bake in the preheated oven for 15-20 minutes. They should be lightly golden brown on top when done. Remove them from the oven and let them cool slightly on a wire rack before serving.
Tips & Tricks
Best Practices for Scone Texture
To achieve a flaky scone, start with cold butter. The cold butter creates steam as it melts, making the scone rise. Cut the butter into small cubes and mix it with your dry ingredients. Stop mixing once you see small lumps. This method keeps the scone light and flaky.
Using cold ingredients is key. Chill your heavy cream and even the bowl if you can. Cold helps maintain the texture we want. The warmer ingredients will melt the butter too soon, leading to dense scones.
Flavor Enhancements
You can substitute fruits and chocolates in many ways. For a twist, try raspberries or blueberries instead of strawberries. If you want a richer flavor, use dark chocolate instead of semi-sweet.
Adding spices or extracts can enhance the taste. Try a pinch of cinnamon or nutmeg for warmth. You can also add almond extract for a lovely nutty flavor. These small changes can make your scones unique and exciting.
Common Mistakes to Avoid
One common mistake is overmixing the dough. Mix just until the ingredients combine. Overmixing can lead to tough scones instead of light and fluffy ones.
Another mistake is not chilling the butter. Soft butter will not give you the right texture. Make sure your butter is cold when you start. This tip is simple but crucial for perfect scones.
Pro Tips
- Use Cold Butter: Make sure your butter is very cold to create flaky scones. You can even freeze it for about 10 minutes before cutting it into cubes.
- Don’t Overmix: When combining the wet and dry ingredients, stir just until they are incorporated. Overmixing can lead to tough scones.
- Fresh Strawberries: Use ripe, fresh strawberries for the best flavor. If they are too soft, freeze them for a short time before dicing to make them easier to handle.
- Bake in Batches: If you have a small oven, consider baking scones in batches to avoid overcrowding the baking sheet, ensuring even baking.
Variations
Seasonal Versions
For summer, I love making strawberry chocolate chip scones. The fresh strawberries shine in every bite. Their sweet, juicy flavor pairs perfectly with the rich chocolate. You can serve them warm with whipped cream for a real treat.
In autumn, I enjoy making pumpkin spice scones. You can mix in pumpkin puree and spices like cinnamon and nutmeg. This gives your scones a warm, cozy flavor. They are perfect for chilly mornings with a cup of tea.
Dietary Modifications
If you need a gluten-free option, use almond flour instead of all-purpose flour. This gives a nice nutty flavor and a great texture. Just make sure to adjust the amount of baking powder.
For vegan scones, swap the butter for coconut oil. Use a plant-based milk in place of heavy cream. You can also replace the egg with a flax egg. This is made by mixing ground flaxseed with water. These changes keep your scones tasty and friendly for everyone.
Flavor Infusions
Try adding different berries for a new twist. Raspberries or blueberries work great in these scones. Each berry gives its own unique flavor, making your scones special.
Adding citrus zest can also brighten the scones. A bit of lemon or orange zest adds a fresh taste. It pairs nicely with the sweetness of the strawberries and chocolate. Don’t be afraid to get creative with your flavors!
Storage Info
Short-Term Storage
To keep your scones fresh at room temperature, place them in an airtight container. This method helps maintain their flaky texture. If you want to store them in the fridge, wrap each scone in plastic wrap. This keeps them moist and tasty for a few days.
Long-Term Storage
For long-term storage, freezing is the best option. Place cooled scones in a freezer-safe bag. Remove as much air as possible. When you want to enjoy them, reheat the scones directly from the freezer. Bake them at 350°F (175°C) for about 10-15 minutes. This method helps keep their light and flaky texture.
Shelf Life
Fresh scones last about 2-3 days at room temperature. If stored in the fridge, they can stay fresh for up to a week. When frozen, scones maintain their quality for about 2-3 months. Remember to check for signs of freezer burn before eating. Enjoy your scones at their best!
FAQs
How to Make Scones Rise?
To make scones rise well, use baking powder and cold butter. Baking powder is a key leavening agent. It creates air pockets that help the scones rise. Cold butter keeps your dough flaky. When you mix cold butter into flour, it forms small lumps. These lumps create steam when baking, making the scones rise. Remember, the colder the butter, the better the scones.
Can I use frozen strawberries?
Yes, you can use frozen strawberries. However, there are some tips to keep in mind. Thaw the strawberries first and drain excess liquid. This helps avoid soggy scones. Fresh strawberries add bright flavor and texture, but frozen ones work too. They are perfect when fresh ones are not in season. Just be careful with the mixing to keep the dough from becoming too wet.
How can I tell when scones are done baking?
You can tell scones are done when they turn golden brown on top. Look for a slight rise and a firm texture. If you tap the bottom, it should sound hollow. This means they cooked through. Keep an eye on the time. Baking usually takes 15 to 20 minutes. Check them around the 15-minute mark to prevent overbaking. Enjoy your perfectly baked scones!
Now you know how to make delicious scones using simple ingredients. From choosing fresh strawberries to baking them just right, every step matters. Remember to keep your butter cold for flaky texture and avoid overmixing. Try different flavors with nuts or spices for a fun twist. Store your scones properly to enjoy them fresh later. Enjoy baking and sharing these treats with friends and family. Your scones will surely impress everyon