Craving a rich and creamy dessert? Look no further than this Vanilla Bean Crème Brûlée. It’s a classic that’s surprisingly simple to make at home! With a few key ingredients and easy steps, you can impress your friends and family with this sweet treat. In this guide, I’ll walk you through the process—transforming simple ingredients into a show-stopping dessert. Let’s dive in and master the art of crème brûlée together!
Why I Love This Recipe
- Rich and Creamy Texture: This crème brûlée has a luxurious mouthfeel that melts in your mouth, making it the perfect indulgent dessert.
- Vanilla Bean Flavor: The use of real vanilla beans elevates the flavor profile, offering a depth that pure vanilla extract simply cannot match.
- Impressive Presentation: The caramelized sugar top provides a beautiful contrast to the creamy custard underneath, making it a stunning dessert for any occasion.
- Customizable Toppings: Serve it with fresh berries or a sprig of mint for a refreshing touch, allowing you to tailor the dish to your taste.
Ingredients
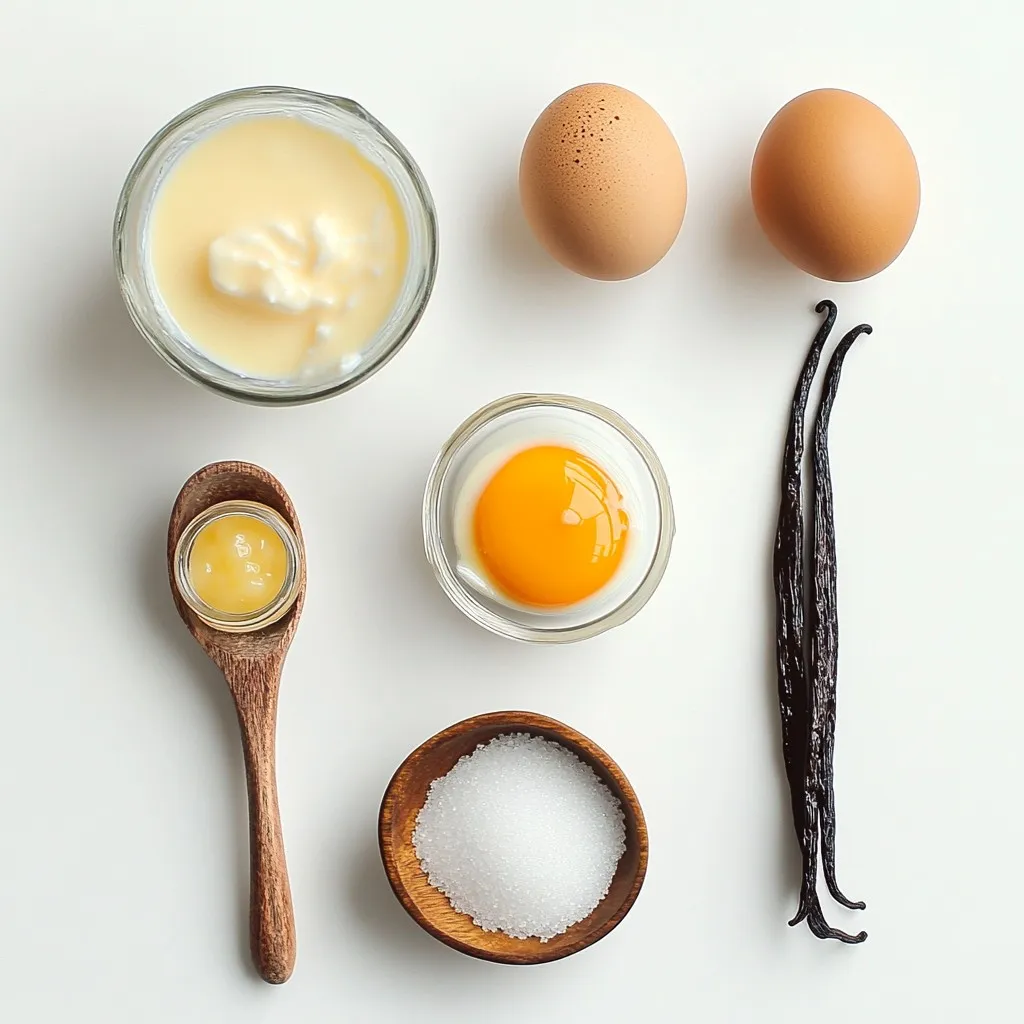
List of Ingredients
– 2 cups heavy cream
– 1 vanilla bean (split and seeds scraped)
– 5 large egg yolks
– 1/2 cup granulated sugar (plus extra for caramelizing)
– 1 teaspoon pure vanilla extract
– Pinch of salt
For a rich and simple dessert, these ingredients are key. Heavy cream gives the crème brûlée its smooth and creamy texture. The vanilla bean adds a deep and fragrant flavor.
Egg yolks serve as the base, creating a rich custard. Granulated sugar not only sweetens but also caramelizes beautifully on top. A touch of vanilla extract enhances the flavor even more. Lastly, a pinch of salt balances the sweetness.
Each ingredient plays a crucial role in making this dessert a standout. They work together to create a sweet, smooth, and creamy treat. You can find these items in most grocery stores. With these basics, you’re ready to craft a delightful vanilla bean crème brûlée.
Step-by-Step Instructions
Preheat and Prepare Cream
First, preheat your oven to 325°F (160°C). This step helps set the right baking temperature. In a medium saucepan, combine 2 cups of heavy cream, the seeds from one split vanilla bean, and the pod itself. Heat the mixture over medium heat until it starts to bubble. Remove it from heat and let it steep for 15 minutes. Steeping is important. It allows the vanilla flavor to infuse into the cream.
Mixing Egg Yolks
While the cream is steeping, take 5 large egg yolks in a separate bowl. Add 1/2 cup of granulated sugar, 1 teaspoon of pure vanilla extract, and a pinch of salt. Whisk these together until the mixture is pale and slightly thickened. This step is crucial as it forms the base of your custard.
Combining and Baking
Now, strain the warm cream mixture through a fine-mesh sieve into the egg yolk mixture. Whisk constantly to prevent the egg yolks from scrambling. After straining, remove the vanilla pod pieces. Mix gently until everything is well combined. Next, divide the mixture among four ramekins. Place the ramekins in a baking dish. Carefully pour hot water into the dish until it reaches halfway up the sides of the ramekins. This water bath helps cook the crème brûlée evenly. Bake for 30-35 minutes. Look for edges that are set and centers that still jiggle slightly. Once they are done, remove the ramekins and let them cool at room temperature for about 30 minutes. Refrigerate them for at least 2 hours or overnight before serving.
Tips & Tricks
Achieving Perfect Custard Texture
To make a silky custard, mix egg yolks gently. Whisk the yolks with sugar until thick. This helps avoid scrambling. When adding the warm cream, do it slowly. Stir constantly while pouring to keep the yolks from cooking too fast.
Using a water bath is key. It cooks the custard evenly. Place ramekins in a baking dish and fill it with hot water. The water should reach halfway up the sides. This gentle heat helps create that smooth texture you want.
Caramelizing Sugar
Caramelizing sugar gives crème brûlée its signature crisp top. A kitchen torch is a great tool for this. Hold the torch a few inches above the sugar. Move it slowly in circles to melt the sugar evenly.
You want the sugar to turn golden brown. Watch closely to avoid burning. Once it bubbles, it’s ready. Let it cool for a minute before serving. This creates a hard shell that contrasts with the creamy custard.
Presentation Tips
How you serve the crème brûlée matters. Keep it in the ramekins for a classic look. Add a few fresh berries or a mint sprig on top. This adds color and flavor.
Consider using a shallow dish for a group. You can make one large crème brûlée and serve it family-style. This can make for a fun dining experience.
Pro Tips
- Use Fresh Vanilla Beans: For the best flavor, opt for fresh vanilla beans rather than extract. This will enhance the aromatic profile of your crème brûlée.
- Control the Caramelization: When using a kitchen torch, keep the flame moving constantly to avoid burning the sugar. Aim for a golden color for the perfect caramelized topping.
- Chill Thoroughly: Allow the custards to chill in the refrigerator for at least 2 hours, but overnight is ideal. This helps them set properly and develop a richer flavor.
- Water Bath Accuracy: Ensure the water bath reaches halfway up the sides of the ramekins for even cooking. This prevents the custards from cracking and helps them bake uniformly.
Variations
Flavor Additions
You can change the flavor of your crème brûlée easily. Try using different extracts for a twist. Almond and hazelnut extracts work well. They add a nutty note that complements the creaminess.
You can also infuse your crème brûlée with fruit flavors. Adding orange zest gives a bright citrus touch. Want something bold? Try espresso for a coffee flavor. These options keep your dessert exciting and fresh.
Dietary Modifications
If you want a dairy-free version, use coconut cream instead of heavy cream. It adds a hint of coconut flavor. You can also try almond milk or soy milk. Just make sure to choose unsweetened varieties.
For a lower sugar option, use natural sweeteners like honey or maple syrup. These can add a unique taste while keeping the sweetness. Adjust the amount based on your preference, but keep it balanced.
Serving Alternatives
Get creative with how you serve your crème brûlée. Instead of ramekins, try small jars. They look cute and make for easy sharing. You can also use larger dishes for a family-style serving.
Pair your crème brûlée with drinks for a nice touch. A sweet dessert wine can enhance the flavors. Coffee is also a great option, especially with the espresso variation. Enjoy experimenting with these ideas!
Storage Info
Refrigeration Guidelines
Store your vanilla bean crème brûlée in the fridge. Use airtight containers to keep them fresh. It stays good for about four days. The flavors deepen over time, making it even better!
Freezing Advice
You can freeze crème brûlée, but it’s not always the best choice. If you must freeze it, wrap the ramekins with plastic wrap. Then, put them in a freezer-safe bag. To serve, let it thaw in the fridge overnight. Reheat gently in a water bath to avoid curdling.
Handling Leftovers
If you have leftover custard, consider making a trifle. Layer it with fruit and cake for a new dessert. To keep the texture, avoid re-baking it. Instead, serve chilled or at room temp to maintain its creaminess.
FAQs
What can I substitute for heavy cream?
You can use half-and-half, whole milk, or coconut cream. Each option changes the taste and texture a bit. For a lighter option, use half-and-half. It will make the crème brûlée less rich. Whole milk works too. It gives a creamier feel than half-and-half. Coconut cream is a great dairy-free choice. It adds a hint of coconut flavor, making it unique and tasty.
How do I know when the crème brûlée is done baking?
Look for the edges. They should be set, while the center jiggles slightly. This means it is not overcooked. You can also check with a knife. Insert it into the center. If it comes out clean, it is done. Timing is key. Bake for 30-35 minutes. Keep an eye on it near the end to avoid overbaking.
Can I prepare the mixture ahead of time?
Yes, you can! Mix the ingredients and pour them into ramekins. Cover them well and store them in the fridge. You can keep them for up to two days before baking. When ready to bake, just follow the normal steps. If you need to reheat, do it gently in the oven. Avoid high heat to keep the texture smooth.
What other toppings can I use besides sugar?
You can try crushed cookies or nuts for a fun twist. Fresh fruit like berries adds color and flavor too. For chocolate lovers, a drizzle of melted chocolate works great. You can even use flavored sugar, like cinnamon or cocoa powder, for extra taste. Get creative with your toppings to make it personal!
This blog post covered how to make a delicious crème brûlée. We discussed the key ingredients, like heavy cream and egg yolks, and shared step-by-step baking instructions. I included tips for achieving the perfect texture and presented variations for creativity. Storage tips help you enjoy each bite later.
Crème brûlée can impress everyone, from your family to guests. Use these methods to create your masterpiece and explore flavors that excite. Enjoy the process and the tasty result